Running Gatling through Gradle – Complete Beginner’s Guide
Want to use Gatling through Gradle? Then you are in the right place. I have been using the stress testing tool Gatling alot recently. It is becoming one of my favorite performance testing tools. There is decent getting started documentation on the Gatling website. But this involves downloading a zip file, then running a BAT or SH script to launch Gatling. You then select the test you want to run from the list.
So yes, it would be much nicer to do all the above through Gradle. Not to mention more convenient. Particularly if you want to run Gatling tests as part of Continuous Integration. One of the big advantages of doing that, is that you can have Gatling fail your CI build if a certain performance threshold is breached (such as too many errors, or average response time being too great etc.)
If you want to run Gatling through Gradle, check out the Gatling Gradle Plugin.
This guide will walk you through setting up the Gradle plugin for a new Gatling project.
Gatling Fundamentals for Stress, Load & Performance Testing – Out now on Udemy!
My Udemy course on Gatling Fundamentals is out now on Udemy.
In the course I take you through everything needed to start using Gatling with the minimum of hassle.
To make this guide even more beginner friendly, we will configure it through an IDE (Intellij). Once the setup is done and working, you can switch to running solely through the command line if you wish.
Let me mention from the outset that I won’t be going into detail on Gatling in this post. If you want a comprehensive introduction to Gatling, check out my post Load Testing with Gatling - The Complete Guide.
Prerequisites
Before we begin, you should check off the list of prerequisites below:
1. Java 8 JDK
You probably have this already, but if not there is an in depth guide on installing the JDK, for all OS types, here.
I strongly recommend you use Java 8 with Gatling, as it’s the most compatible
2. Intellij
I’ll be using Intellij for this guide, you can grab the latest version of Intellij here.
And that’s all you need! The Gatling Gradle Plugin handles the installation of Scala, and if you run through the Gradle Wrapper there is no need to even download or install Gradle on your system.
Let’s look at how we can use the plugin to get up and running.
Guide To Running Gatling through Gradle
Starting a Gradle project for Scala through Intellij is frustratingly difficult, as I have found out over the years.
The best way to get started, is to create a sample project.
- Run the following command in a terminal or command prompt to create a sample project with the Gatling Gradle plugin:
curl -sL https://raw.githubusercontent.com/lkishalmi/gradle-gatling-plugin/master/bootstrap.sh | \
    bash -s ~/sample-gradle-gatling && \
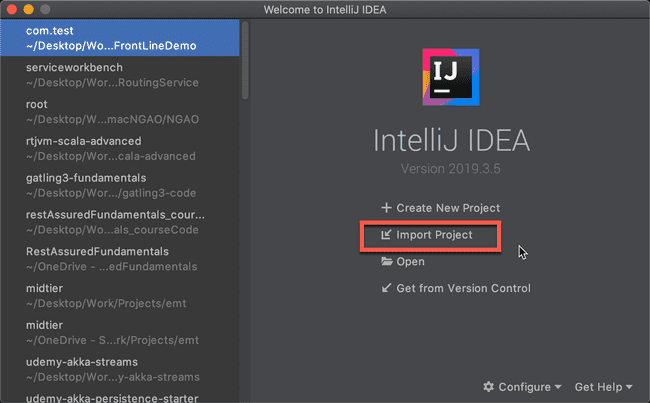
cd ~/sample-gradle-gatling && ./gradlew gatlingRun- Open the IntelliJ landing page and choose Import Project
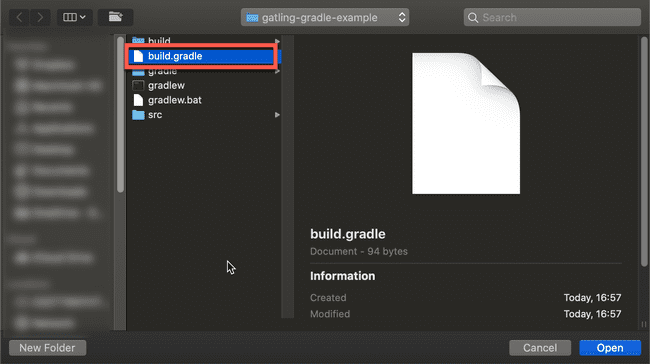
- Select the
build.gradlefile from the repository you downloaded in step 1, and click Open
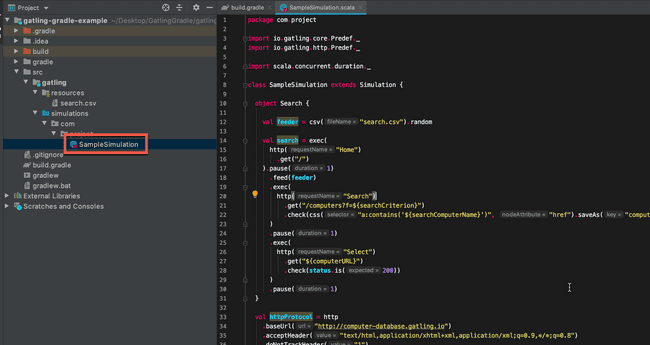
- Open the
SampleSimulationfile
- You might see a popup similar to below. Choose
Setup Scala SDK
- Choose the SDK for Scala. If it isn’t in the list, you may need to click
Configureinstead and first download the Scala binaries.
- That should be everything setup. To run a Gatling test through Gradle, type in:
./gradlew gatlingRunOr to run a specific test:
./gradlew gatlingRun-SampleSimulationFor more information on using and configuring the plugin, check out the official documentation for the Gatling Gradle Plugin


